All,
Three games in three days, we're cooking with gas now, though I really need to get some painting/basing done.
Yesterday, on Col Louis-Louis' orders, Maj Lapieux's Foreign Legion Task Force entered the village of Kabalouey, secured the villagers, and safely evacuated them while dealing heavy casualties to the AoDD, or Army of DUMDUM, the local Islamists trying to overthrow the government. General Pouspous was beside himself with anger over Col Louis-Louis' decision to evacuate the villagers, believing it to show weakness to the enemy. Gen Pouspous ordered Col Louis-Louis to immediately reinstate the villagers of Kabalouey, and deal any AoDD forces a severe blow in the process. Of course, Col Louis-Louis promptly turned to Major Lapieux and, without further explanation, ordered the his task force to return the civilians to the village of Kabalouey. Such is life in the Legion...

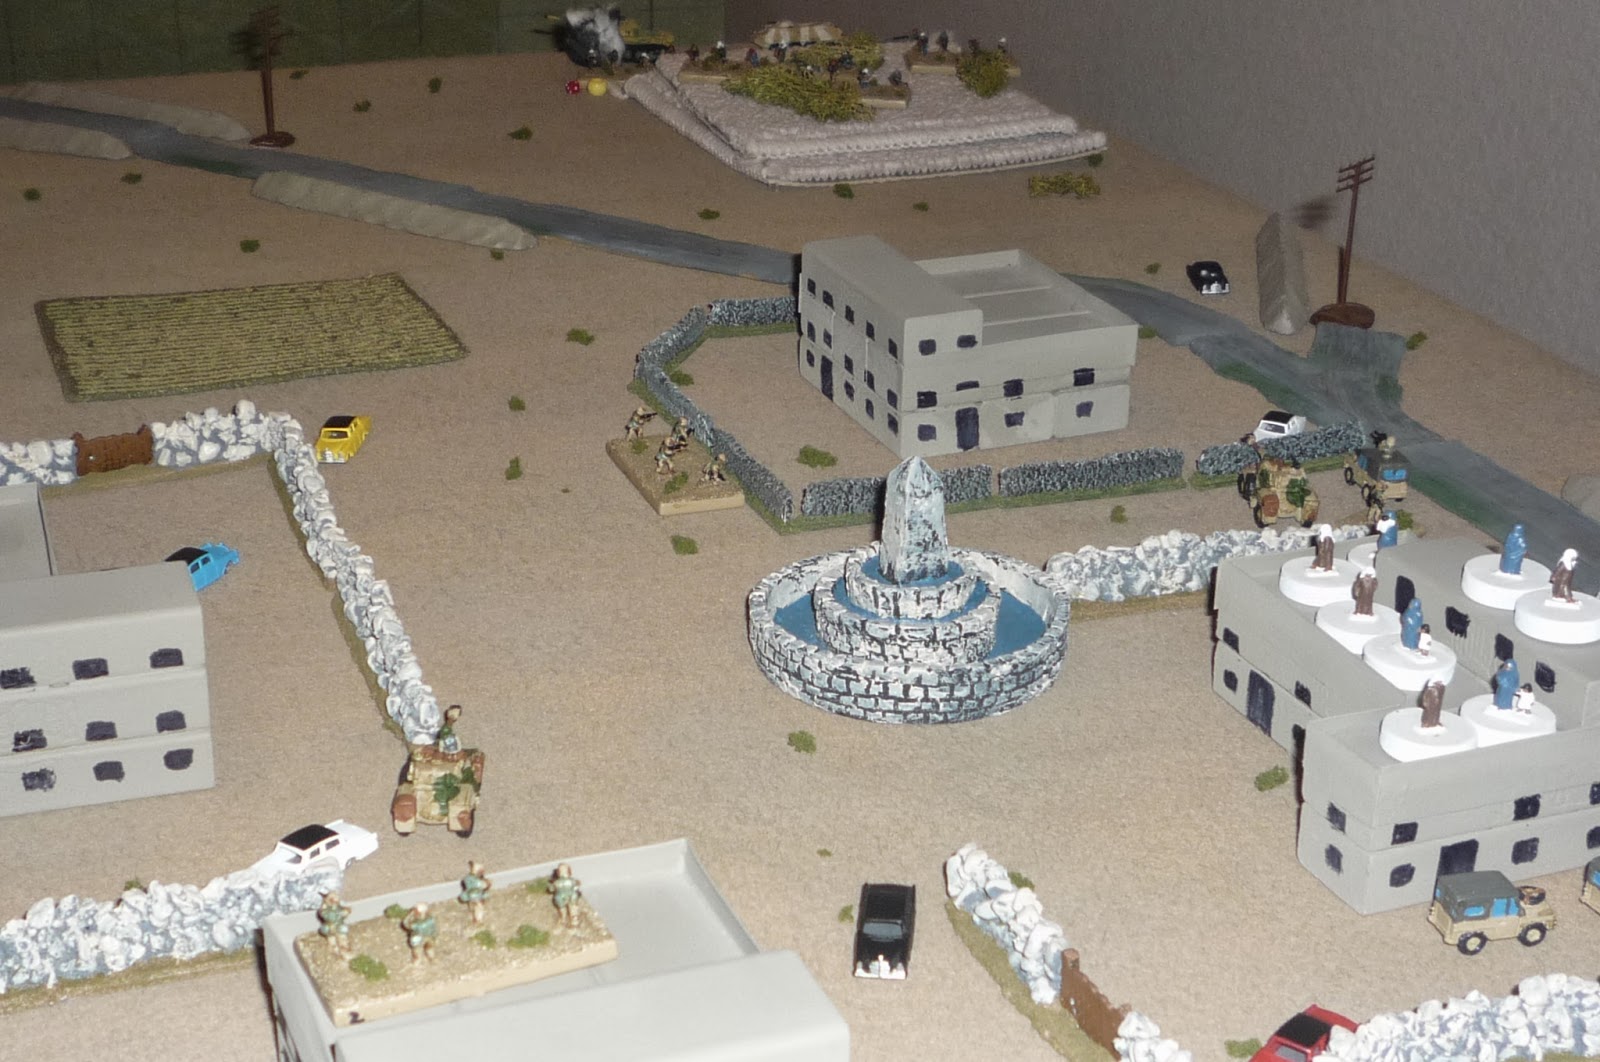
Overview of the table. I shifted everything slightly right (east), as the enemy would have forces entering from the top right (NE hotspot), top left (NW hotspot), and bottom left (SW hotspot), black chips marking the hotspots.
The formerly peaceful village of Kabalouey, to which the Legionnaires will be returning its small collection of civilians. Just like yesterday, the buildings are: bottom rt 1, bottom lf 2, top rt 3, top lf 4.
The French column of mercy; these are the only forces the French will start with on the board. From left to right: V1 (carrying Ldr and Tm1), V2, S1, S2, and S3 (all carrying civilian villagers), and V3 (carrying Tm2). The plan is to drive straight up the highway, deposit the villagers, hang around for a bit until Perplakistan 'regulars' show up to garrison the village, then return to base.
There is no reporting regarding enemy disposition or intentions in the area, so with the simple mission and the fact the AoDD took heavy casualties the past two days, Major Lapieux is not really expecting much contact today.
But just in case things get sideways, here's the Quick Reaction Force (QRF): H1 (carrying Ldr, Milan, and Tm3 and 4), and H2 (carrying Ldr, MG, SAM, and Tm5 and 6). Theoretically, these guys should be enjoying what is essentially a day off. Don't count on it...
The FFL column enters the table in the SE corner, moving towards the ville.
The column gets closer (I'm rolling to see when the enemy springs out).
The column enters the ville and disgorges its passengers. Top left is V3 and Tm2, far right is V1 and Tm1, center is (left to right) V2, S1, S2, and S3, having just cut loose their civilians.
And here they come. Between what he can see with his own two eyes and the reports crackling over the radio, the blood drains from Major Lapieux's face... It's not so much the horde of insurgents, it's all the armor. Lapieux quickly spots two T-55s and two BTR-60s, and that's just what he can see! Merde! It's no secret the neighboring nation of Tumoria is supporting the AoDD, but now they have apparently provided more than just small arms and ammunition.
Here is the NE hotspot, looking SW back towards the village. That's a leader, 4 rifle teams, a T-55, a BTR, and the recoiless rifle technical. You can see V1 and Tm1 at top right beside the wall flanking bldg 4.
This is the NW hotspot, looking SE back towards the ville. A leader, 1 rifle tm, a T-55, and a BTR.
The SW hotspot, looking NE towards the ville: leader and two rifle tms at left, planning to get across the canal and into the grove, a rifle team, T-55, BTR, and HMG technical on the right, intent on flanking the ville from the south, cutting off the French' avenue of escape (vehicles cannot traverse the canals).
Lapieux orders all the civilians into bldg 1, and the unarmed S1 and S2 take shelter there as well (this is looking north). Lapieux lights a cigarette and calmly calls for the QRF.
V3 (bottom rt) moves up, takes the NE hotspot under fire, gets two hits on one of the enemy teams. S-3 joins V3, but fails its roll, so no shooting. Return fire misses V3, but pins S3 and its Mk19. Tm1 moves right to the wall, trying to get to bldg 3, but fails its roll. Ldr moves over and unpins S3. V1 is at left.
V1 falls back (bottom left), bounces a 90mm round off the NE T-55, gets another shot, and knocks it out (top right)! Return fire misses. Tm2 (bottom left) enters bldg 2, fires at insurgent team that just shot at V1, gets two hits and pins them.
V2 (bottom left) goes after the NW T-55, and sends them to Allah (I'm not cheating: rolled 4D6, hitting on 4+, got 2 hits, rolled 2D6 to save on 3+, got one save, rolled for effect, 6 on a D6, Ka-Boom!).
Meanwhile, at the SW hotspot, the insurgent leader and two teams manage to get to and cross the canal (top left), while the T-55, BTR (carrying one team), and HMG technical push east, looking to flank the ville from the south.
At the NW hotspot, insurgent rifle team moves into the grove, then fails, while the BTR (bottom left, looking SE) moves up and fires at Tm2 (bldg 2, top center), but misses. Tm2 returns fire with its LAW, damaging the BTR's engine and pinning it. V2 (at base of bldg 2) goes after the insurgent team in the grove, test two hits and pins them. Things are looking up.
Until we get to the NE hotspot. Sorry for the funky angle, but it's kinda tough to get a good shot. At bottom right is the NE hotspot, and all the bad guys that go with it. At left (looking right to left is looking north to south) is the ville, with Tm1 in the near bldg (bldg 3), with V3 and S3 behind the wall just behind (to left) of bldg 3. V1 is at top left, adjacent bldg 4.
The insurgent teams on the hill fire up the RPGs: an RPG slams into V1, killing all aboard. Tm1 dashes for cover in bldg 3, but then an insurgent team goes nuts and busts V3 wide open with an RPG, passes another roll, and splatters S3 (the Land Rover w/Mk19) all over the street with another RPG. Another insurgent team managed three rounds of fire on Tm1 (in bldg 3), but managed to attain only one hit, which was saved.
Then the Technical climbs up the hill and begins slamming recoiless rifle rounds (3 times!) into bldg 3, getting 2 hits and pinning Tm1. Lastly, the BTR moved up and put another hit on Tm1. This was the turn from hell...
V2 (bottom center) takes on the NW BTR, and busts it open, then puts two rounds of fire into the insurgent team in the grove, eliminating them. V2 passed one more round, and with no enemy in sight, I put them on overwatch (white bead). Tm2 is in the bldg next to V2, adn to the right you can see the burning V1. Tm2 got three rounds of fire on the NE hotspot (off camera to top right), getting 3 hits and pinning an insurgent team.
Tm1 (far left, in bldg 3) is unpinned by the leader, and fires at the NE Technical, pinning it. They passed another roll, shifted fire and got two hits and pinned an insurgent team. The BTR and another insurgent team returned fire, to no effect.
The cavalry arrives! H1 swoops in on the NW hotspot, but fails the next roll and so is unable to off-load its troops, which really sucks!!! Let's talk strategy for a moment: I've got the QRF on the way, but where do you put them? I decided to put the Milan and a couple rifle teams out there on the NW hotspot, the idea being to have the ATGM with a field of fire covering the NE hotspot (top left) and to the SE (top right) where the SW hotspot vehicles would be rounding the bend to close with the ville from the south.
The problem at the beginning of the turn was that there were still bad guys at the NW hotspot, but I got very lucky with V2 whacking the BTR and insurgent team. I'm still taking a big risk with H1: because I didn't get troops out on the ground (which would 'kill' the hotspot), enemy reinforcements could arrive directly under my helo! We'll see what happens...
H2 swoops in, and the leader, MG, SAM, and Tm5 and 6 fast rope out onto bldg 4 (looking SE).
SAM team moves down to V1, starting its mission of policing up all the casualties. They manage to carry the V1 casualties to S2 and get them loaded (not pictured).
Looking NE from bldg 4. The MG (far rt of bldg 4) goes to work on the insurgents on the hill (top), eliminating a team, shifting right, then putting two hits on another insurgent team. Tms 5 and 6 (far left of bldg 4) both fire LAWs at the BTR, pinning it (but otherwise it's unhurt, and now they have nothing to hurt it). They get two more rounds of fire in, and turn on the Technical. The first round immobilized it, and the second destroyed the recoiless rifle. The crew fled the immobile, impotent vehicle.
At the NE hotspot (top right), the insurgent leader unpins a team, moves to the BTR, and unpins it as well. The BTR, of all things, turns its 14.5mm HMG on H2, which is still in a hover above bldg 4; the helo succumbs to a hail of very big bullets and sets down roughly in the field west of the ville (if you look closely, you can see the casualty figure next to the helo. Any time a vehicle/team is eliminated I'm placing a casualty marker there, which has to be retrieved and evacuated).
But the BTR isn't finished. It passes another roll, puts a hit on Tm5 (dead center, with yellow bead, on top of bldg 4), then it rolls boxcars, so puts two more hits on Tm5, and pins them as well.
Still at the NE hotspot (bottom rt), an insurgent team takes a shot at Tm1 (center, on bldg 3), while the other two insurgent teams can't manage to unpin. Tm5 couldn't unpin either, though return fire did alright: the MG eliminated an insurgent team, Tm6 put a hit on one, Tm1's fire had no effect, and Tm2 (way back on bldg2, top left) eliminated an enemy team. The SAM tm moved to S3 to gather up the casualties (just to the left of bldg 3).
From the SW hotspot, the insurgent leader and two teams crept through the canal grove and finally got into position (center left; the photo is looking SW from bldg 2, at right). V2 is still on overwatch, and could have shot first, but I figured the T-55, BTR, and Technical would be coming soon (from the left in this photo), so I held onto overwatch and attempted to weather the storm.
The insurgent team promptly popped an RPG into V2, though it only damaged the targeting system/optics.
And, as predicted, here comes the T-55, BTR, and Technical (pic looking south to north). As V2 was on overwatch, V2 goes first, and slams a 90mm round into the T-55, which... damages its engine. Ouch. The T-55 returns the favor, immobilizing V2. The Technical fires its HMG at V2, hoping to add to the damage, to no effect.
Then the BTR dumps out its insurgent team, which promptly rolls box cars (two actions). They move up nice and close to V2, then slam an RPG into it, sending three Legionnaires straight to hell!
S1 and S2, which had been sheltering on the south side of bldg 1, see the enemy armor appear and motor to the take shelter on the north side of bldg 1.
Back at the NW hotspot, the leader, MILAN, and rifle teams 3 and 4 descend the fastrope onto the hill, 'killing' the enemy hotspot.
Major Lapieux can't catch a break: not only did the enemy get reinforcements in the form of a leader and four rifle teams (bottom left, they came on at the SW hotspot, as opposed to the NE hotspot, which would have been better for the French.
At the NW hill, H1 departs the area, and the MILAN (bottom left) fires NE (not pictured, top left) at the NE BTR, damaging its targeting system and pinning it. Then the MILAN rolls boxcars: two actions. My plan is to shoot SE (top), to hit the T-55 and BTR approaching the village from the south. Part one goes according to plan: the T-55 gets hit by the wire-guided missile, ripping its turret off.
But the fire, smoke, and secondary explosions blocked line of sight to the BTR...
So the MILAN swung back left (top, northeast), and put another missile into the NE BTR, destroying it.
My good rolling continued: you're looking at Tms 3 and 4, looking south at all the enemy teams that just came on as reinforcements at the SW hotspot. 3 and 4 went to work with their rifles and SAWs, putting hits on and pinning three of the four teams. However, the fourth team's return fire pinned Tm4 (center, with yellow bead).
Back in the ville, the MG and Tm6 (bldg 4, bottom center) engaged in four rounds of fire(!) on the insurgents at the canal (top), though they only managed two hits and a pin on one team, and one hit on the other... Tm5 (also on bldg 4, bottom) managed to unpin and fire to the NE hotspot, getting a hit.
Tm2 (bottom, on bldg 2, photo is north to south) turns south and engages the insurgent team (left) that destroyed V2: 4 hits and a pin, incredible shooting! Then they turned their firepower on the HMG Technical (top center), and ripped it to pieces with their rifles, SAW, and grenade launcher. BOOM! They passed another roll, and since they couldn't hurt the BTR, and weren't worried about the insurgent team they already tore up, turned to their right (west) and engaged the enemy at the canal, but to no effect.
On bldg 3 (bottom rt), Tm1 fired at the NE hotspot, eliminating the last insurgent team there. They passed another roll and double-timed back south, ending up adjacent bldg 1 (top left). The SAM Tm grabbed the V3 casualties and dragged them to S1, preparing to load them (center).
After I double-timed Tm1 south, away from the NE hotspot, it occurred to me that I was cheating, that is, I moved the team south because I knew what no real-world commander could know: that no more enemy troops would be coming So, in real life I should have maintained a 360, but in game terms I wanted to maximize my firepower against the remaining enemy.
In my defense, I provide three justifications for my cowardly actions: 1) I want to win, not lose, though normally I won't cheat to ensure that; 2) normally I wouldn't have ended enemy reinforcements, but I needed to get this game over as I'm missing football; and 3) aside from missing football, I needed to get this over because I was an emotional wreck! You may not get the sense from this write-up, but with all the Panhards and the only armed Land Rover burning, H1 shot down, Tm1 and Tm5 down to their last two hits, and absolutely no more help on the way, there was a very real shot at the Legion performing another glorious last-stand. By the time I reached this point in the game, I was confident of victory and just wanted to hurry up and finish it. Please forgive me.

At the SW hotspot (pic is south to north), the insurgent leader tries to unpin his units but can't, though one manages to unpin itself, but then fails its roll. The remaining unpinned team jumps ahead and puts a hit on Tm4, which can't unpin. But then Tm4 unleashes hell on the, getting four hits and pinning them.
At the canal, only one insurgent team (top left) is able to unpin, and it lays into Tm2 (bottom left), getting 2 hits and pinning it. Tm6 and the MG (bottom right) lay into the canal insurgents, getting two hits on one and one hit on the other, while Tm5 moves off bldg 4 to the wall to the west.
In the south, somehow the insurgent team unpins, and fires at Tm2, to no effect (top left). Then the BTR fires at Tm2, but gets no hits. The MILAN Tm (center bottom, at the NW hotspot looking SE) reacted to the BTRs firing and slammed a missile straight into it, destroying the last of the insurgents' vehicles.
Still on the NW hotspot, the leader unpinned Tm4, who opened fire on the insurgents at the SW hotspot, getting two hits an pinning a team, whom Tm3 then eliminated.
In bldg 4 (bottom center), the MG team team put two hits on one of the insurgent teams at the canal. There were two insurgent teams, both badly beat up at this point. Following the MG, Tm6 opened up, eliminating one team, then, passing another roll, finished off the other.
Tm2, in bldg 2 (center) fired on the insurgent team to the south, but missed, and failed its next roll. Then Tm1 (behind wall to left (east) of Tm2) moved up and fired at the insurgent team to the south, and missed also. Tm1 passed another roll and promptly eliminated the insurgent team.
At this point, the only bad guys had lost 3 T-55s, 3 BTR-60s, 2 Technicals, and a boatload of men. The only insurgents still on the board were two very badly beaten up teams adjacent the canal at the SW hotspot, and they headed for the hills.
Wow! That quickly turned into a mess, and there were a couple moments there where I was pretty sure it was over. The bad guys certainly made up for all their bad die rolling (for AT fire) in the first two games, putting out four vehicles and a helo. The resultant loss of firepower and mobility, and having to worry about CASEVAC (though not overly so, as they were really in a fight for their lives), certainly had a deleterious effect on French combat power. As each rifle team only had one LAW, and none of them succeeded in knocking out a vehicle, I was having visions of my infantry being swarmed and overrun by enemy armor.
The rules are working out great, and I finally got the leaders in the game. Back to work, AKA, real life, so we'll see what the future holds for games, but I'm having a lot of fun with these rules and forces. If I have any problems, it's that I don't have enough troops and vehicles. I'm thinking about making it a European affair, or maybe even a NATO affair, as I have some modern Brits and Modern US sitting around that need to be finished. That would give me an interesting hodge-podge of desert forces on the friendly side, but wouldn't do much for the bad guys. I do have a bunch of Taliban (Minifigs "Mountain Insurgents") that need to be finished, and I have some guys I think will do for semi-modern Arab/African infantry, with plenty of vehicles to use with them, I just need to get to work.
Hope you had as much fun as I did!
V/R
Jack


No comments:
Post a Comment